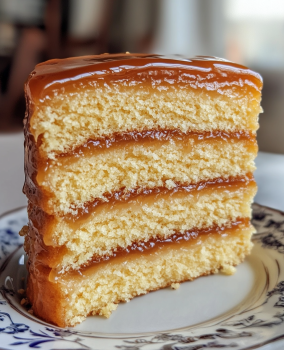
Salted Caramel Kentucky Butter Cake
Jump to Recipe
This Salted Caramel Kentucky Butter Cake is rich, buttery, and downright irresistible. It’s made with a tender vanilla cake soaked in a sweet butter glaze, then finished with a glossy homemade salted caramel drizzle. The result? A moist, melt-in-your-mouth dessert that looks fancy but is actually super simple to make — no decorating skills required!
This cake is a family favorite around here, especially during the holidays and special occasions. I love that it’s easy enough for a weekday bake but indulgent enough to serve to guests. Plus, it only gets better the next day!
Why You’ll Love This Cake
-
Super Moist Texture – Thanks to the buttery glaze that soaks into every bite.
-
Decadent Caramel Drizzle – Sweet and salty, it adds a rich finish that really takes it over the top.
-
Crowd-Pleaser – This cake disappears fast at potlucks, birthdays, and dinner parties.
-
Make-Ahead Friendly – In fact, it tastes even better the next day!
-
No Fuss Baking – Simple ingredients, straightforward steps, and a whole lot of flavor.
Ingredients You’ll Need
For the Cake:
-
3 cups all-purpose flour
-
2 cups granulated sugar
-
1 tsp baking powder
-
½ tsp baking soda
-
1 tsp salt
-
1 cup unsalted butter, softened
-
4 large eggs
-
1 cup buttermilk
-
2 tsp vanilla extract
For the Butter Glaze:
-
¾ cup granulated sugar
-
⅓ cup unsalted butter
-
3 tbsp water
-
2 tsp vanilla extract
For the Salted Caramel Drizzle:
-
1 cup granulated sugar
-
6 tbsp unsalted butter, cut into pieces
-
½ cup heavy cream
-
1 tsp sea salt
Shortcut Tip: You can also use a good-quality store-bought salted caramel if you’re in a hurry!

How to Make Salted Caramel Kentucky Butter Cake
Step 1: Preheat & Prep the Pan
Preheat your oven to 325°F. Grease and flour a 9-inch deep round pan or a Bundt pan. If using a Bundt, make sure you grease into every curve — nothing’s worse than a cake that sticks!
Step 2: Mix the Dry Ingredients
In a large bowl, whisk together the flour, baking powder, baking soda, and salt. Set aside.
Step 3: Cream Butter & Sugar
In a separate bowl, use a hand mixer or stand mixer to beat the butter and sugar together for 3–5 minutes, until light and fluffy. This step helps create that airy texture we all love.
Step 4: Add Eggs & Vanilla
Beat in the eggs one at a time, then mix in the vanilla. Scrape down the sides of the bowl to make sure everything’s incorporated.
Step 5: Alternate Wet & Dry
With your mixer on low, add the flour mixture in thirds, alternating with the buttermilk. Start and end with the dry ingredients. Mix just until combined — don’t overdo it!
Step 6: Bake
Pour the batter into your prepared pan and smooth the top. Bake for 60–70 minutes, or until a toothpick comes out clean or with a few moist crumbs. Let the cake rest in the pan for 15 minutes.
Step 7: Make the Butter Glaze
While the cake is cooling, melt the sugar, butter, water, and vanilla in a small saucepan over medium heat. Stir until smooth — no need to boil.
Step 8: Glaze the Cake
Poke holes all over the warm cake using a toothpick or skewer. Slowly pour the warm glaze over the cake, letting it soak in. Let the cake sit another 10–15 minutes to absorb the glaze, then invert onto a wire rack to cool completely.
Step 9: Make the Salted Caramel
In a heavy-bottomed pan, melt the sugar over medium heat. Stir occasionally until it turns a deep amber color. Carefully add the butter and stir until melted, then slowly add the cream (it will bubble up!). Stir in the sea salt and simmer for another minute or two. Let cool slightly before using.
Step 10: Drizzle & Serve
Once the cake is fully cooled, drizzle that rich caramel all over the top. I like to let it drip down the sides for that classic “wow” effect. Sprinkle with a bit of flaky sea salt for extra flair!
Tips for Success
-
Room Temp Ingredients: Butter, eggs, and buttermilk should all be at room temp for a smooth batter.
-
Grease Your Pan Well: Especially if using a Bundt pan — every nook and cranny matters.
-
Don’t Rush the Cooling: Let the cake cool completely before adding the caramel or it might slide right off.
-
Let the Glaze Soak In: The holes help it really sink into the crumb for that signature moist texture.
-
Use Real Vanilla: It’s worth it for the flavor!
Serving Ideas
This cake is a showstopper on its own, but here are a few fun ways to serve it:
-
With a scoop of vanilla ice cream
-
Alongside fresh berries or berry compote
-
With a dollop of whipped cream
-
Paired with strong coffee or espresso
-
Drizzled with extra caramel (no judgment!)
Storage & Make-Ahead Tips
Room Temperature: Wrap tightly and store for up to 3 days.
Refrigerator: Keeps for 5–6 days. Bring to room temp or warm slices slightly before serving.
Freezer-Friendly: Wrap slices in plastic and foil, then freeze for up to 3 months. Thaw in the fridge overnight.
Nutrition (Per Slice – Approximate)
-
Calories: 540
-
Fat: 28g
-
Carbs: 68g
-
Sugar: 49g
-
Protein: 5g
This is a rich treat meant for sharing — and trust me, no one will turn down a slice!
Recipe FAQs
Can I make it ahead of time?
Yes! It tastes even better the next day. Just wait to add the caramel until just before serving.
Can I skip the caramel?
You can — the butter glaze alone is amazing. But the salted caramel definitely adds that extra something.
Don’t have buttermilk?
No problem! Mix 1 cup milk with 1 tbsp vinegar or lemon juice. Let sit for 5–10 minutes before using.
Can I use a different pan?
Yes — just adjust baking time if using two round pans or a 9×13. Check with a toothpick for doneness.
Caramel tips?
Don’t walk away! Caramel goes from perfect to burnt quickly. Wait for that deep amber color before adding the butter.
The Bottom Line
This Salted Caramel Kentucky Butter Cake is the ultimate comfort dessert — rich, moist, and completely indulgent. Whether you’re serving it at a holiday gathering or sneaking a slice after dinner, it’s one of those recipes you’ll find yourself making again and again. It’s simple, nostalgic, and absolutely delicious.
If you’re looking for a dessert that delivers maximum flavor with minimal fuss — this is it.